Thursday, July 9, 2009

Praline Eclairs!! Oh My!


Today in Culinary School we made Paris Brest. Sounds pretty great, huh? Well, it is. It is pate a choux (the dough that makes eclairs, cream puffs, and profiteroles, among other things) shaped in wreaths, baked with almonds ontop, and cut in half. Then, praline pastry cream is piped into the bottom half, then whipped cream. The top is coated with chocolate stripes and sprinkled with confectioners sugar. Delicious!

Well, I felt inspired to make my own at home, since I had leftover praline pastry cream and the pate a choux we made in class used glutenous bread flour. So I got to work. And here are the recipes:

Praline Pastry Cream
In a saucepan, infuse 1/4 vanilla bean (cut in half and with the seeds scraped out and added to the pot along with the pod -- you can also substitute with 1 tsp vanilla extract) with 1/3 cup sugar and 1 and 1/2 cups whole milk. This basically means: heat the ingredients over the stove until little foamy bubbles form around the edges of the saucepan and little whisps of steam begin to rise up. Set aside.

In a separate bowl, mix 4 egg yolks with 1/3 cup sugar and 1/3 cup cornstarch.

Temper the eggs: pour 1/3 of the steeping milk mixture into the egg mixture while whisking. Pour this mixture back into the milk (in the saucepan).

Place the saucepan back on the stove over medium heat until the mixture begins to thicken. Stir constantly. You want to cook the custard for at least one minute to cook off the corn starch taste but you do not want your eggs to curdle.

When it is thick (like pudding) and you have cooked the corn starch off, strain the mixture into a bowl. To the bowl add 1 tbs butter and 2 tbs praline paste. (Praline paste can be found at some specialty natural food stores. You can also substitute with the more common cashew or almond butters.) Stir them until the butter and paste melt into the custard and are fully incorporated. Cover with plastic wrap and place in the refrigerator.

Gluten Free Pate a Choux
First, preheat your oven to 400 degrees F.

In a saucepan, heat to a gentle boil: 1/2 cup water, 1/4 cup butter, 1 pinch salt, 1 tsp sugar, and 1/2 tsp vanilla extract.

When the butter is all melted and the mixture is bubbling gently add "1/2 cup minus 1 tbs superfine rice flour". It will absorb very quickly, so be sure to stir, stir, stir with a stiff spoon (no spatulas, people!). You want to get all the flour chunks out. Stir over the heat until a skin begins to form on the bottom.

Immediately, place into a standing mixer bowl and mix on medium for five minutes. This will cool it. If you do not have a standing mixer, place the dough in a bowl and mix with a hand mixer. But be careful, this dough is very gooey and will throw your hand mixer all around so have a firm grip!

When the dough is cool add 2 eggs plus 1 egg white, one at a time. With each addition of egg or egg white, mix on high in the mixer bowl until it is fully incorporated. When all of the egg is added, the dough should be gooey like glue or paste. A bit of dough between your thumb and forefinger should stretch to at least 2 inches, like this:


Pour the dough into a piping bag and pipe onto a parchment paper lined sheet pan. You can pipe eclairs (long strips) or puffs, or any shape you like, really. Here are mine before I popped them in the oven (not my best piping work):


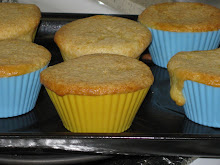
Bake the dough for about 45 minutes. You want the eclairs/puffs to be golden brown and you want to make sure to cook the dough all the way through. If there is raw egg inside the puffs/eclairs, they will turn green on the inside! When they are done, they sound hollow when tapped and, when broken open, the dough is firmly cooked through. (Always make one extra puff so you can open it and see how it looks inside.) Let the eclairs/puffs cool on a cooling rack. Here is what my puffs looked like when they came out of the oven. Not exactly uniform:


*Interesting tidbit: pate a choux translates in French to "cabbage paste." Guess the guy who invented this dough thought that, after it was baked, the little puffs that came out of the oven looked like cabbages...how quaint!

Chocolate Coating
Boil a pot of water on the stove. When it is boiling, turn the heat off and place a bowl filled with coating chocolate (6 oz will do) ontop. Stir it gently until the chocolate melts. Keep it over the warm water to prevent it from seizing and getting hard again. It will look something like this:


Praline Eclairs
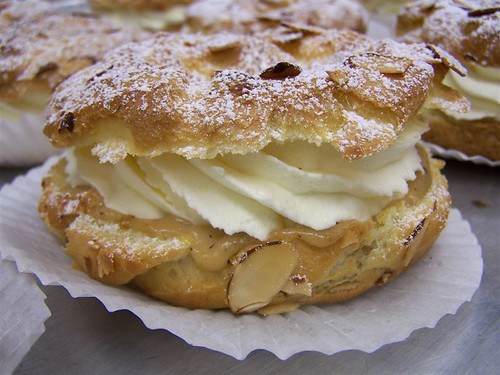
To assemble the eclairs, first cut them in half lengthways. Dip the tops in the coating chocolate and let them harden. Fill the bottoms with the praline pastry cream. Put the tops on the bottoms and, voila! You've got delicious eclairs. (You can also poke a hole in the side of the eclair and, using a pastry bag with a hard tip, squeeze the filling in; then coat the top with chocolate. Be careful to bite the end with the hole in it though!) Here are some glamour shots to feast your eyes on:


Strawberry Rhubarb Cake!

Hello, hello! So I have to apologize for not writing in a while. The last few weeks have just flown by! I found myself back east to visit family for the 4th of July and am settling into my first week back.

Before I left for my vacation, I made a delightful Gluten Free Strawberry Rhubarb cake. June was Strawberry season (hurray!) and I had to take advantage of the delicious gems at my local farmer's market. The cake was delicious. Again, I used Annalise Roberts' recipe for vanilla cake. (As in my post about my lemon cream cheese cake, follow this link to Annalise Roberts' recipe archive and click on the vanilla cupcakes page. I used the amounts in the recipe for this Stawberry Rhubarb pie.)I poured the batter into a pyrex dish and sprinkled chopped strawberries and rhubarb into the dish. Here is a photo of it before placing it in the oven:


Looks pretty great to me. When the cake bakes it expands, because of all of the leaveners and air whipped into the batter when you beat it. But because of the weight of the berries and rhubarb, the cake only rises much around the edges:


This cake did take a while to bake. The center stays cooler because of the berries and takes a while to get fully cooked. But once a toothpick inserted into the center comes out clean, you have a delightful cake! Don't worry if the edges brown, they still taste wonderful!

Here's the final result:

Ooh! I just LOVE the taste of strawberries and rhubarb! This cake is perfect if you don't feel like going through the mess of baking a whole Strawberry Rhubarb pie. Hope you enjoy!

Friday, June 19, 2009

Betty Crocker GF Baking Mixes - Chocolate Chip Cookies

Not sure if everyone is aware of this, but Betty Crocker has just released four gluten free baking mixes this month! I was scouring my grocery store for them and, sadly, only found one: the chocolate chip cookies baking mix. Now, as a culinary student, I am always more interested in baking things from scratch to further my recipe knowledge and repertoire, but I figured for the sake of science and you readers, I'd try these out and give a review. 

First off, below is a picture from the back of the box featuring all of the GF mixes they make that are now on shelves. 


Here is a photo of the front of the Chocolate Cookie Mix box. 


The great part about his mix (and, most likely, the other ones) is that you don't need any fancy or expensive ingredients to bake these very tasty cookies. (The mix cost me $4.49 at my local Ralph's grocery store, and the mix made 22 cookies -- that's only $0.20 per cookie!) All you need is 1 stick (1/2 cup) butter. 1 tsp GF vanilla, and 1 egg. (I didn't try the recipe dairy or egg free, but I'm sure that, where there's a will, there's a way.) I find it very frustrating when recipes call for 5, 6, or even 7 types of gluten free flour to make a recipe good. So it was nice to have it in the box. Also, there are only three flours listed in the ingredients - Rice Flour, Potato Starch, and Potato Flour. In addition to these flours, the ingredients listed on the box are: Semi-Sweet Chocolate Chips, Brown Sugar, Sugar, Leavening, and Salt. (Don't forget you also add butter, vanilla, and egg.) The allergen listed on the box is soy (soy lecithin is in the chocolate chips).

So, off to baking...

All you need to so is mix (I recommend electric, either handheld of stand mixer) the butter, vanilla, and egg, add in the mix and stir. It's that easy. The batter is crumbly, like cobbler topping. I scooped out tablespoon-sized balls of dough onto two parchment-lined baking pans and baked at 350 F for 10-15 mins. (But your oven may be different from mine, so always check every few minutes.) Fresh out of the oven, these cookies are soft and gooey, but as they cool, the sugar solidifies and they become crunchy. If you want chewier cookies, you may need to add more moisture to the recipe (butter, eggs, etc.). See this article for more info. 

Here is a photo of these goodies in the oven.


Yum! Here's a photo of the final result.

Other than the bite I took out of the bottom right cookie (I couldn't help myself!), you may have noticed that the cookies on the right are flat and kind of ran into each other and the ones on the left have more texture and better shape. During my time in culinary school, I've learned a trick for cookies and pies crusts: always freeze for 20 minutes before baking. I decided to run a little experiment to see what the difference was, so I baked one pan that I had frozen first and another that I had not. Here is a close up to better show you the difference.


The unfrozen/frozen cookies basically tasted the same, although the frozen ones passed the milk-dunking test (yes, that's the official name) with flying colors, while the thinner, unfrozen ones had a harder time soaking up the milk. Also, I believe that the frozen cookies just plain look better and more appealing. You may be wondering why this difference occurs, and here is why: frozen cookies are cold all the way through, but when you place the frozen dough in the over the outside begins to cook faster than the inside. When the outside cooks the proteins coagulate and the starches gelatinize, creating structure before the rest of the cookie is baked all the way through. As the rest of the dough warms, it melts and breaks up the baked outer shell (hence, the nice texture of the finished product). The melting of the inside still causes the cookies to cool a bit, but they hold a plumper shape than the runny, non-frozen ones.

So, all in all, freeze them first if you want that professional-grade look. Otherwise, it all basically tastes the same! 

My review of this mix is definitely two thumbs up for price, simplicity, and delicious end result. Enjoy!

Thursday, June 18, 2009

GF cake recipe review...plus some!

A few nights ago, I decided to have an adventure in the kitchen...baking a cake. Now, I think most GF cake mixes are great, but my mission here was to bake a gluten free cake from scratch that wasn't grainy, crumbly, or dry (even the next day). I'll skip the suspense and say I was successful. Very successful.

Below is a photo of the cake I baked in its entirety. And, boy, was it delicious.


The components of the final piece were yellow cake, lemon curd filling, with lemon cream cheese frosting (and strawberries to top it off -- which went really well with the lemon taste!). It was DELICIOUS. I mean moist, smooth, a nice crumb but not crumbly. Man, was I pleased.

Yellow Cake
For the cake, I used Annalise Roberts' recipe from her book, Gluten-Free Baking Classics. I read a LOT of gluten free blogs and this book has come up a lot, and for good reason (this recipe was a hit!). I really do recommend you buy this book. I got it for $19.61 total at a Barnes & Noble (cheaper online!) the other day and, so far, it was well worth it. In my opinion, if the yellow cake recipe is successful (or any basic recipe at that), then the cost of the book pays off. Here is a link to Roberts' archive of recipes on her website. The recipe I used is called "Vanilla Cupcakes (gluten free)" on that page and is near the bottom. I doubled this recipe in order to bake two 9" cake pans. Be sure to spray each pan and cut out parchment paper to place on the bottom of each pan.

One thing I will remark on, though, is what I believe to be the secret to Gluten Free baking -- superfine brown rice flour. No, not just rice flour, or even white rice flour. It must be superfine. Why, you ask? Well, just feel the difference. I've tried a lot of different flours in my time. A lot of different rice flours, also. The best one I can remember using was bought at a Chinese grocery. And, you guessed it folks, it was superfine. Now that was probably four years ago and, for the past long time, I've been killing myself wondering why Bob's Red Mill's Brown Rice Flour, or White Rice Flour was not doing the job. Well, superfine is the secret. And Annalise Roberts speaks about this very explicitly in the third chapter of her book. She writes,"It is very important that you use an extra finely ground brown rice flour (not just any grind), or your baked goods will be gritty, heavy and/or crumbly.... [Other kinds] of brown rice flour have a larger grind that you can actually feel between your fingers. They are not powdery...and it really does make a difference. If you want or need to use the other [kinds], try to find one with the finest grind you can."* If only I had known that! Well needless to say, she was right. Roberts earns her name, "The Food Philosopher".

Roberts recommends the Authentic Foods Superfine Brown Rice Flour, which is what I used. Upon opening the package and just feeling the flour, I knew I was on the right track. In comparison to Bob's Red Mill's rice flours, the Superfine flour feels less gritty, and more like real (wheat) cake flour. A good sign, indeed. Well, combined with tapioca flour and potato starch, the flour mix worked like a charm. The cakes came out nicely, even with a crispy top to them, which I enjoyed.

Lemon Curd Filling

This recipe, I adapted from my culinary school's docket. It's great - zap! It hits your tongue with that tangy lemon bite and finishes off with a wonderful sweetness. As a filling in a cake, it adds a nice lemon zip and cuts through the rest of the sweetness of the cake. Recipe follows:
  • In a saucepan, bring 1" water to a boil.
  • In a separate bowl, that will fit ontop of the saucepan without touching the water, mixvery thoroughly: 1 and 1/2 whole eggs, 1 and 1/2 egg yolks, 7 Tbs granulated sugar, zest from one lemon, and 5 and 1/2 Tbs lemon juice.
  • Place the bowl on top of the saucepan. This is called a double-boiler or bain marie.
  • Stir the mixture very thoroughly with a spatula, being careful to scrape the bottom frequently. When the eggs have thickened, remove the bowl from the heat, careful to wipe the condensation from the bottom. The curd should be smooth and thick. There should not be any scrambled bits of egg. If there are you did not stir throughly enough.
  • Place 2 Tbs butter in a bowl and strain the lemon curd into this bowl. Straining will get out any scrambled egg bits, lemon seeds, or pulp.
  • Cover with plastic wrap so a skin does not form and place in the refrigeratorimmediatelyto cool.
  • When cooled, you can use as a filling. Or just eat it.
Lemon Cream Cheese Frosting

In my opinion, this was the best part of the cake. (Well, maybe the victory of finally baking a cake from scratch that tasted great was the best part, but the frosting was really, really tasty.) This recipe was, again, adapted from the culinary school experience, with some tweaks worked in. The recipe follows:

  • In a mixer bowl with paddle attachment (or just a bowl with a handheld electric mixer), add: 1/2 cup softened unsalted butter, 3/4 cup plus 2 Tbs cream cheese, 2 and 1/2 cups powdered sugar, 1/4 tsp lemon zest, 1/2 tsp GF vanilla extract, 1/4 tsp sea salt.
  • Mix on low until the powdered sugar is somewhat incorporated.
  • Slowly dial up speed to high, and mix for 2 minutes until smooth and fluffy.
  • Store frosting in fridge until you are ready to cover your cake.
The best part about this cake was that I brought it into culinary school to have all my gluten-eating friends try it. I got very positive reviews, so I think this one's a winner. One chef instructor even said she preferred the moistness of this cake to regular gluten-containing cakes. I also gave a slice of my cake to two other classes for them to try. The chef instructor of one of those two classes asked her students to try the cake, without telling them it was gluten free. She said they really liked it and couldn't even tell. Hurray! (That is pretty much my goal in life!)

If you still aren't a believer that this cake, well, takes the cake, here are some more cake pictures:


YUMMY!


Note: Just because I prefer superfine rice flour over those at Bob's Red Mill (BRM) doesn't mean I dislike BRM. In fact, I LOVE THEM! Thanks to Bob's, numerous GF flours are available on the market to people like us. And they are delicious. Teff, millet, sorghum, etc. Wonderful, whole grains that taste complex and delightful! Bob's offers great grains to us Americans, which we would otherwise be completely unaware of. I feel that without companies like Bob's Red Mill, these grains may go by the wayside...forever. And what would be the good in that? Thanks, Bob! You are doing America a great service!

* Roberts, Annalise. Gluten-Free Baking Classics. Chicago: Surrey Books, 2008, page 7.

Tuesday, June 16, 2009

Successful baking: measure equal parts science and passion, mix and bake

As my first post, I thought I'd give a brief introduction. For all intents and purposes, my name is Chunchie. I was diagnosed with Celiac Disease in the Spring of 2002 and have been gluten free ever since! I grew up with a love of food, cooking, baking, the works. My fondest memories from my childhood are those in the kitchen. My mother is an incredible cook and always showed her love for us kids through the food she made for us. My father is the master barbequer and chinese chef. So, in translation, for me, food is love.

I first moved away from home in 2000 and had a rough transition. Needless to say, I was eating all the wrong things (bagels, pasta, bread, etc) and feeling worse and worse - deep depression from a normally very happy girl, exhaustion, intestinal cramps, diarrhea, constipation. I literally felt like I was drowning, sinking deeper and deeper with no way of swimming to the surface. Luckily, my family's physician ran blood tests to screen for lyme disease and he decided that, on the off chance, he'd run one for wheat. Lo and behold, the wheat came up positive and, after gastrointestinal biopsy, I was confirmed as having Celiac Disease!

I was half horrified at the magnitude of the diagnosis - no cake! no doughnuts! no pizza! no beer! - and half relieved - I could finally breathe again, the world felt manageable. A couple weeks after my diagnosis, I received a package in the mail from my mother. Homemade gluten free chocolate cookies. Soft. Chewy. Delicious! I already knew she loved me, and this is how she showed it. But this gift was even more touching. It meant she had my back. She wanted to help. From then on, there was always gluten free pasta at the dinner table, or recipes were altered so I could be included. She taught me that this was manageable, too, and also very delicious! From that point forward, well maybe a few weeks after I decided that I could approach Celiac Disease from two angles: one, I could whine, and complain, and get upset at all that I was missing out; or two, I could pick myself up, dust myself off, and get to the kitchen! Well, I picked the latter, and have truly found so many culinary delights along the way.

Fast forward six years, it's 2008 and I'm working in outside of New York City at a corporation, in a cubicle, earning money, but longing...longing...longing for that cute little corner bakery, filled with delicious GF goodies that everyone will want to eat (not just celiacs!). Eventually I pack up my bags, apartment, precious kitchen appliances (please don't break! please don't break!), and ship out west to Los Angeles. But, all that distance, for what purpose? Among others, culinary school. Yes, culinary school. For baking and patisserie to be exact. I know, I know, hours each day spent toiling over my worst enemy, gluten. But it is totally worth it.

Ultimately, I want to learn how to bake. Bake really, really well. Gluten free. I figure learning the techniques at school is worth the looming risk of getting sick. So far so good. And in the end, I hope I can translate my skills into Gluten Free baked goods. I know, it's gonna take hours and hours of toiling in the kitchen. Lots of recipes thrown away because they are too grainy, or crumbly, or just plain bad. But in the end, food is love. And I love to bake. Maybe one day I'll have that bakery. It's gonna be a long, long road. But I'll share it with you, with this blog, the diary of my adventures in gluten free baking.